Balloon-Powered Car
Abstract
Do you think you could build a car powered by nothing but air? A balloon-powered car is pushed forward by air escaping from a balloon, and it is fun and easy to build with materials you already have around your house. Can you imagine how you would want your own balloon-powered car to look? Can you design a car that will travel as far as possible? You can even measure your car's speed using your smartphone and a special sensor app. Get ready to grab some simple supplies to bring your idea to life!
Summary
This engineering challenge is based on an internal competition designed by employees at Fluor Corporation.
Objective
Design and build your own balloon-powered car that will travel as far and fast as possible.
Introduction
Balloon-powered cars, like the ones in Figure 1, are fun to build and even more fun to play with. In this project you will be challenged to build and test your own balloon-powered car. A balloon-powered car consists of three main parts:
- The body of the car (piece of cardboard or plastic bottle in Figure 1)
- The wheels of the car (CDs or plastic bottle caps in Figure 1)
- The axles, which connect the wheels to the body, and allow the wheels to spin (wooden skewers in Figure 1)
Continue reading to learn more about the physics of how a balloon-powered car works.
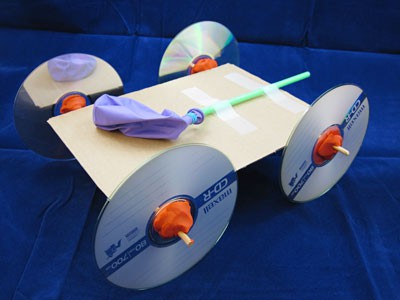
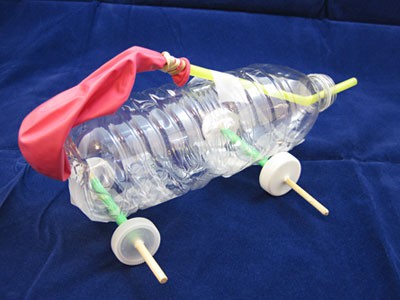
Figure 1. Some examples of balloon-powered cars made from different materials.
Have you ever blown up a balloon and then let it go, without tying it shut? The air rapidly escapes from the balloon, making it zip all over the room! This is because when you blow up a balloon, you increase the air pressure inside the balloon. This air pressure stretches out the rubber balloon material, just like stretching a rubber band. Both the air pressure and the stretched rubber store potential energy, or energy that is "waiting" to do something. See Figure 2.

Figure 2. (Left) An un-inflated balloon does not store any potential energy. (Right) An inflated balloon stores potential energy in the forms of air pressure and stretched rubber.
When you let the balloon go, the rubber contracts, and air is rapidly squeezed out the opening of the balloon. The potential energy inside the balloon is converted to kinetic energy, or energy of motion, of the fast-moving air through the opening. Because the air is pushed out rapidly backwards, there is a reaction force that pushes the balloon forward, as shown in Figure 3. This principle comes from Newton's third law of motion, which states "for every action, there is an equal and opposite reaction."
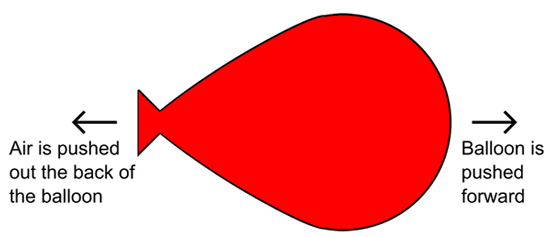
Figure 3. According to Newton's third law of motion, when air is pushed backwards out of the balloon (out the end with the opening), there must be an equal and opposite reaction force that pushes the balloon forward (the end opposite the opening).
When you just let a balloon go on its own, it tends to randomly fly around the room, and is almost impossible to steer. However, when you attach the balloon to a car, like the ones shown in Figure 1, you can harness the balloon's energy to propel the car forward! The engineering goal in this project will be to design, build, and test a car that is powered by nothing but a balloon. You want to design your car so it can travel as far as possible. For the ultimate test, you can follow a strict set of design rules used in the 2015 Engineering Challenge (see the Procedure for details).
Terms and Concepts
- Body (of a car)
- Wheel
- Axle
- Air pressure
- Potential energy
- Kinetic energy
- Reaction force
- Newton's third law of motion
- Design requirements
- Iteration
Questions
- What is potential energy?
- What are some different ways potential energy can be stored?
- What is kinetic energy?
- What is Newton's third law of motion?
- What are some common materials and designs used to build balloon cars?
Bibliography
- Rader, A. (n.d.). Energy Around Us. Physics4Kids. Retrieved December 15, 2014.
- Rader, A. (n.d.). Newton's Laws of Motion. Physics4Kids. Retrieved December 15, 2014.
Materials and Equipment
If you want to challenge yourself and compare your car's performance to other students' cars, you can follow the guidelines in the 2015 Engineering Challenge where you can only use the materials listed here. The maximum allowable quantity for each item is listed in parenthesis.
- CDs (4)
- Latex balloons, 9 inch (2)
- Jumbo straws, approximately 1/2 inch diameter and 9 inches long (2).
- Note that these are also referred to as "milkshake straws" or "smoothie straws." They are available from Amazon.com.
- Wooden pencil, 7 3/8 inch long (2)
- Sheets of paper, 8.5 x 11 inch (10)
- Jumbo paper clips, 1 3/4 inch long (6)
- Scotch® tape (1 roll)
- Scissors (allowed as a tool only, not a construction material)
If you just want to build a car for fun, or for a science fair project, you can pick which materials you want to use. Many different materials will work, but here are some suggestions:
- Something to form the "body" of the car, such as a plastic bottle, plastic cup, piece of Styrofoam®, cardboard box, or piece of corrugated cardboard
- Round objects for wheels, like CDs, bottle caps, or empty rolls of tape
- Axles, such as wooden pencils or skewers
- Material to connect the wheels to the axles, like a dry sponge or modeling clay
- Plastic drinking straws, used to connect the axles to the car's body, and to attach the balloon to the car
- Construction materials to hold things together, such as glue, tape, binder clips, paper clips, and rubber bands
- Balloons
- Cutting tools like scissors and a hobby knife
- Open area to test your car
- Lab notebook
- Tape measure
- Optional: Digital camera or smartphone to document your design process
- Optional: Smartphone with a sensor app such as phyphox, available for free on Google Play for Android devices (version 4.0 or newer) or from the App Store for iOS devices (iOS 9.0 or newer).
Note: Phyphox does not support the light sensor on iOS devices. If you need the light sensor, you have to use Android devices for your experiment. Note that on some devices the light sensor is only updated when there is a coarse change of illuminance. This means that if the light intensity does not change or only changes slightly, the sensor appears to not record any data. The recording will continue once the light intensity changes again. If your experiments allows, it helps to wiggle the phone or the light source (e.g. flashlight) slightly to induce minimal reading fluctuations and keep the sensor active.See the instructions in the Sensor App section of the Procedure to learn how to use the app with this project.
Experimental Procedure
Overview of the Challenge
The goal of this project is to design and build a balloon-powered car. Balloon-powered means the car is propelled forward by nothing other than air escaping from a balloon. Since this is an engineering project, you need to specify your design requirements. You can come up with your own design requirements, but here are some suggestions:
- The car should be sturdy and not fall apart when in use.
- The car should go straight.
- The car should go as far as possible.
There are several different options for the project:
- You can build a balloon car using any materials that you want.
- You can measure your car's velocity using a mobile phone equipped with a sensor app. See Sensor App section of the procedure for more details.
- You can follow the rules from the 2015 Engineering Challenge, which has strict rules about how you can build your car and what it must accomplish. While the 2015 challenge is over, you can still follow the rules and compare your car to the high scores. See the Engineering Challenge section for more details.
Designing Your Car
Once you have defined your design requirements, you need to start designing your car. The design phase is an important part of the engineering design process. There is no fixed procedure for this section; you get to come up with your own design! If you are new to the engineering design process, here are some suggested steps to get you started:
- Do some background research on balloon-powered cars. Do an internet image or video search for "balloon powered car" and you will see many different designs, made from different materials. This can inspire your design.
- Think about what materials you want to use for your car, and how you will connect the different pieces together. For example, what do you want to use for wheels?
- Make a sketch of your design on paper before you start building. Figure 4 shows an example sketch of a design. Documenting your design ideas is important for an engineering project, especially if you are entering a science fair.
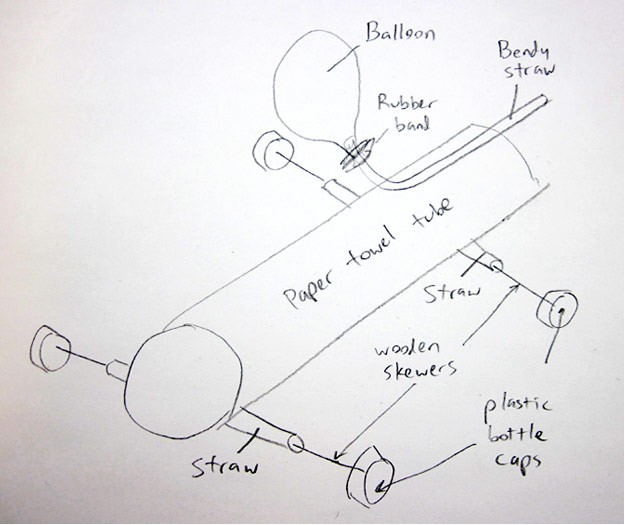
Figure 4. An example sketch of a balloon car design.
Note: The following steps include some specific tips that might be helpful when building your car, but remember that you do not have to use the construction methods shown in this project.
- Many balloon-powered car designs attach the neck of the balloon to a "bendy" straw using a rubber band, as shown in Figure 5. This makes it easier to attach the balloon to your car, to inflate the balloon, and to aim the direction of the air escaping the balloon.
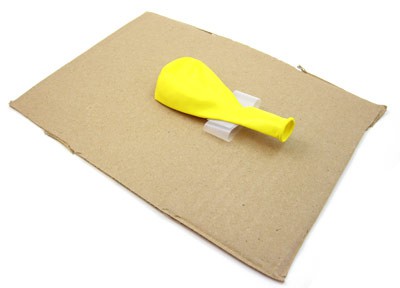
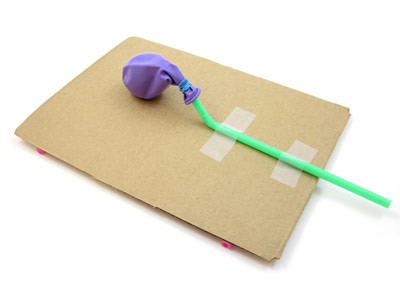
Figure 5. (Left) If the balloon is attached directly to the body of the car with tape, it will be difficult to inflate the balloon and aim the escaping air. (Right) If you attach the balloon to a straw first, it is easier to work with.
- Most balloon cars work better if the axles can rotate freely. If you insert a pencil or skewer through a drinking straw—as shown in Figure 6—this will allow it to rotate and serve as an axle.
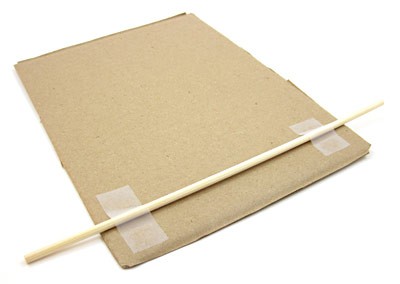
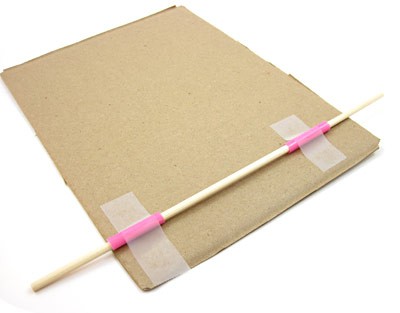
Figure 6. (Left) If the skewer is taped directly to the cardboard body of the car, it cannot rotate, so it does not make a good axle. (Right) If the skewer is inserted through pieces of straw that are taped to the cardboard, then it can spin freely.
- Wheels usually work better if they are centered on the axles and do not wobble. Depending on what you use for wheels and axles, you will need to come up with a way to securely attach them. Figure 7 shows an example.
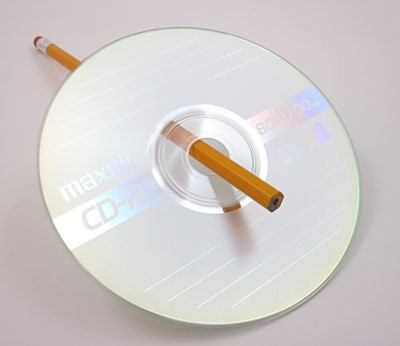
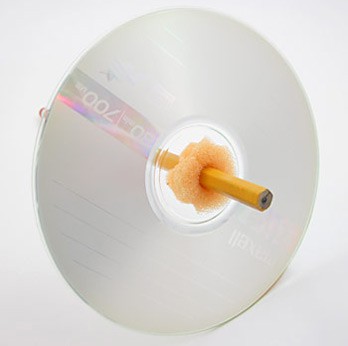
Figure 7. (Left) The hole in the middle of the CD is much too big for the pencil, so the CD will wobble on the axle and not make a good wheel. (Right) If the hole is filled with a bit of modeling clay or a sponge, the CD will stay securely in place.
Building Your Car
Once you are done designing your car, it is time to start building! Again, there is no fixed procedure for this section. How you build your car will depend on the design you came up with and the materials you decided to use. Once you think your car is ready, move on to the next section to begin testing.
Optional: If you have a digital camera or smartphone, take pictures of your car. This will help you document your design process, which will be useful when you make your project display board.
Testing Your Car
Engineering projects rarely work perfectly on the first try! Now it is time to test your car, and possibly redesign it or make improvements, depending on how well it works. This is called iteration, which is an important part of the engineering design process. Here is a suggested procedure for testing your car:
- Inflate the balloon (by blowing through the straw, if you attached it to a straw).
- Pinch the end of the balloon shut, or put your finger over the end of the straw, to prevent air from escaping.
- Put your car down on the floor, and let go of the balloon.
- Optional: If you have a digital camera or smartphone, you can take a video of your car's test run. It might help to have a volunteer operate the camera while you operate the car.
- Watch your car closely! Does it move forward? Pay close attention to whether the car meets your design requirements, and write down your observations in your lab notebook. For example:
- Does the car go straight?
- How far does the car go? Use a tape measure to record how far the car traveled from where it started to where it came to a complete stop, and write this distance down in your lab notebook.
- Did any parts of the car fall apart?
- Repeat steps 1–4 a few times until you are comfortable handling your car and seeing how it works.
- Depending on how well your car works, your next steps may vary. Write down your observations and ideas in your lab notebook.
- If your car does not work at all (it does not move forward even a little bit, or it falls apart), try to figure out what is wrong. Are the wheels stuck? Is the car too heavy for the balloon to push? Do you need to use more tape to hold things together?
- If your car works, but not very well (it only moves forward a little, or it moves but turns to one side instead of going straight), try to figure out how you could improve it. Are the wheels or axles crooked, causing the car to turn? Are the wheels getting slightly stuck, preventing the car from going fast?
- Even if your car works well, think about what changes you could make to improve it. Can you modify your car to make it go even farther? What happens if you try to inflate the balloon even more?
- Based on what you find in step 6, make changes to the design and construction of your car.
- Optional: If you have a digital camera or smartphone, take pictures of all the changes you make to your car. This will help you document the different iterations of your design process.
- Repeat steps 1–7 until your car meets all of your design requirements. It might take you many tries to get your car working properly, and this is okay! There is no "right answer" to an engineering problem. Now, think about the design process you went through:
- How many different iterations did it take you to reach your final solution?
- Did you have to make major changes or do a total redesign of your car, or did you only make small changes and fixes?
- If you took pictures, compare the first picture of your car to the last picture. How much did your car change?
- Repeat several test runs with your completed car, and record how far it travels. What is the longest distance you can get your car to go?
Optional: Using A Sensor App To Measure The Car's Velocity
Specific sensor apps such as phyphox let you record data using sensors that are built into many smartphones, including a light sensor which measures light levels (normally this sensor is used to automatically adjust the brightness of your phone's screen). In this project, you can use the app to measure the velocity of your balloon car. You will do this by having your car pass between the phone and a light source, so it will block the light sensor and affect the reading.
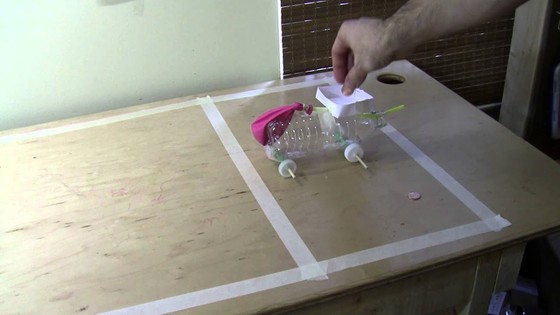
- If necessary, modify the body of your balloon car so it will completely block light. For example, you may need to do this if your car's body is transparent (like a plastic bottle) or if it has a frame built from straws that lets a lot of light through. The car in Figure 8 uses a piece of construction paper taped to the frame.
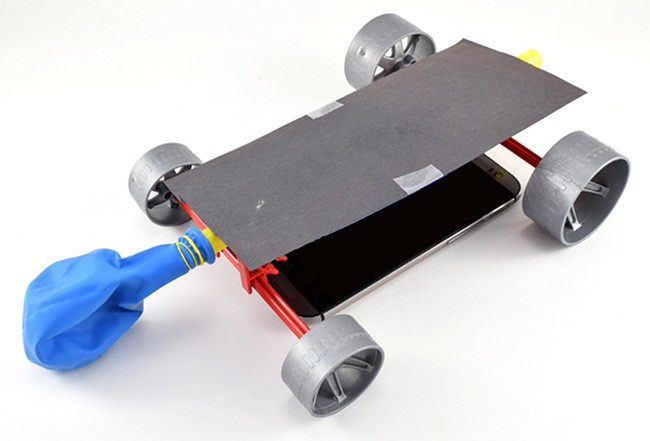
Figure 8. Balloon car with a piece of construction paper taped to the frame to block light.
- Place your phone face-up on a flat surface beneath an overhead light. Make sure your car can drive directly over the phone (so the phone goes between the car's wheels) without hitting it or getting stuck. If your car does not have enough clearance to drive over your phone without hitting it, you will need to mount your phone on its side, and let the car drive between your phone and a light source (like a lamp or a window on a sunny day).
- In the app, open the light sensor and press the play button to start a recording.
- Inflate the balloon and let your car drive over the phone.
- Press the pause button to stop recording and save your experiment. Your graph should look something like Figure 9. If there is not a clear drop in the light reading, you may need to adjust the position of your phone, or use a brighter light source.
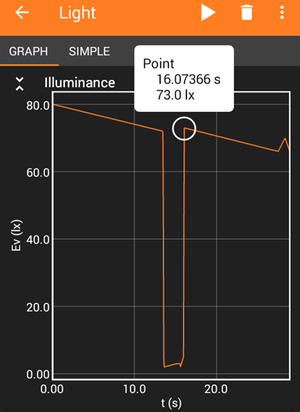
Figure 9. Example graph showing how the light sensor reading drops when the car drives over the phone. The x-axis shows time in seconds [s] and the y-axis is light intensity in lux.
- Use a ruler to measure the length of the part of your car that blocks light. For example, if your car has large CD wheels that stick out to the front and back, and you are placing the phone face-up under the car, do not count the wheels as part of the length because they will not block light. However, if you put your phone on its side, then the wheels will block light, so should be included in the length. If the balloon sticks out in front of the car, you may need to include it in your measurement, but keep in mind that the balloon will deflate as your car moves. So, whether you measure the balloon when it is inflated or deflated depends on where you place your phone relative to the car when it starts moving.
- With the 'pick data' tool in phyphox, select the data point when the light reading drops, and when the light reading goes back up. Calculate the difference between these two times. For example, in Figure 9, the reading goes down at 13.5 seconds and back up at 16.1 seconds, a difference of 2.6 seconds.
- Calculate your car's velocity (v) using Equation 1. You can do this because you know that the car moved a distance equal to its own length (d) in the amount of time that it blocked the light (t).
Equation 1:
- v is velocity in meters per second (m/s)
- d is distance in meters (m), the length you measured in step 6
- t is time in seconds (s), the time you measured in step 7
- Now, try using this technique to measure velocity as you change your car's design. Can you design a car that will achieve the highest maximum velocity?
Optional: The Engineering Challenge
The 2015 Engineering Challenge has very specific guidelines for building your car, and a scoring system for measuring its performance. The goal is for the car to transport weights from a starting area to a finish area. Points are awarded for how much weight the car can carry, and for unused construction materials. A summary of the rules and scoring guidelines, with an explanatory video, is presented later.
-
Materials: The challenge limits you to a specific list of materials you can use to build your car. You do not have to use all the materials, but you cannot use other materials, or more than the maximum allowable quantity. You earn points for each unused item. The material requirements are summarized in Table 1. You can use scissors to cut the construction materials.
- For example, each CD is worth 500 points, and you can use a maximum of 4 CDs. If you only use 2 CDs, you will earn 1,000 points.
- Note: Use of the tape is not pro-rated based on the amount you use. You can only earn 200 points if you do not use any tape at all.
| Item | Maximum Number Allowed | Points per unused item | Maximum Possible Points |
|---|---|---|---|
| CD | 4 | 500 | 2,000 |
| Balloon (9 inch latex) |
2 | 3,000 | 6,000 |
| Jumbo straw (Approx. 1/2 inch diameter, 9 inches long ) |
2 | 200 | 400 |
| Pencil (7 3/8 inches long) |
2 | 100 | 200 |
| Paper (8.5 inch by 11 inch) |
10 | 50 | 500 |
| Jumbo paper clip (1 ¾ inches long) |
6 | 10 | 60 |
| Scotch tape | 1 roll | 200 | 200 |
- Weights: You must use US pennies as weights. Each penny is worth 40 points.
- Car Dimensions: the completed car (not counting the balloons) cannot be more than 28 inches wide, 18 inches long, or 24 inches tall. It must fit completely within "Area A" of the test area (see next step).
-
Test Area Dimensions: The car must operate in a test area with dimensions as shown in Figure 10, and follow these rules:
- The car must start completely within Area A.
- You can only handle the car (setting it up, blowing up the balloon, etc.) while it is in Area A. You cannot touch the car after it has started moving.
- The weights must cross the finish line before going out of bounds. It is okay if parts of the car go out of bounds, as long as the weights are still in bounds (see Figure 11).
- It is okay if the weights keep moving and go out of bounds (over the side lines or back lines) after they have crossed the finish line.
- The test area should be a smooth surface (like a wood tabletop), not a rough surface like a carpet or tile floor with dips in between the tiles.
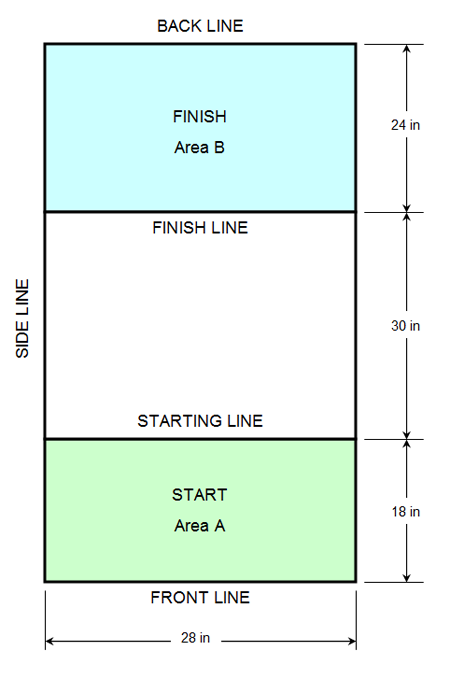
Figure 10. Official test area dimensions. The car must start completely within Area A, and transport the weights to Area B before the weights go out of bounds by crossing a side line.
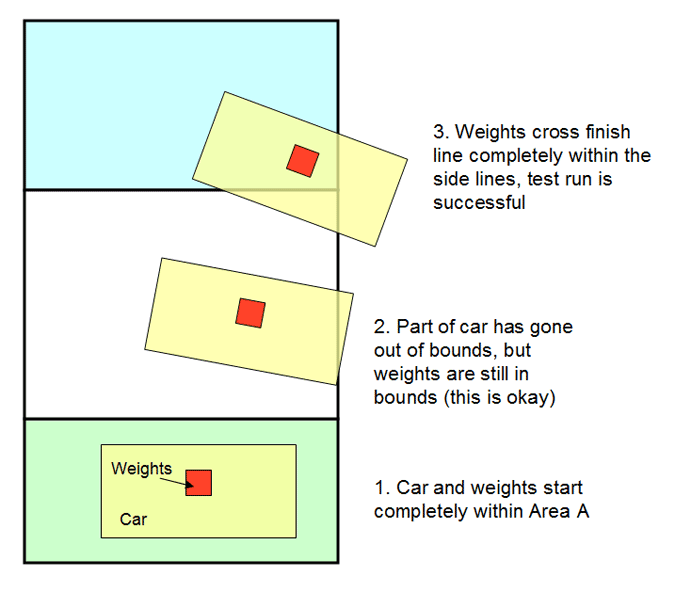
Figure 11. An example of a successful test run. The weights and car start completely within Area A, and the weights (but not necessarily all of the car) cross the finish line completely before going out of bounds.