Build a Floating Maglev Train
Abstract
How can you make a train without wheels? By using magnets! In this project you will build a magnetic levitation ("maglev" for short) train that floats above a magnetic track. How much weight can you add to the train before it sinks down and touches the track?Summary
Objective
Measure how the distance between a levitating train and the tracks changes as you add weight to the train.
Introduction
Does a train without wheels sound crazy? How could a train possibly move along the tracks without wheels? Trains that hover just above the tracks are actually possible due to magnetic levitation, or maglev for short. These trains use powerful magnets to stay in the air. Magnets generate a magnetic field. This magnetic field can push or pull on other nearby magnets, or generate a force. Whether the magnets push or pull depends on the direction in which the magnetic poles are facing.
In the case of a maglev train, this magnetic force is used to push against the train's weight. Weight is the force that pulls an object down toward the earth because of gravity. If the magnetic force is strong enough, it can overcome the train's weight and push it up into the air! Figure 1 shows a diagram of the forces acting on the maglev train that you will build in this project.
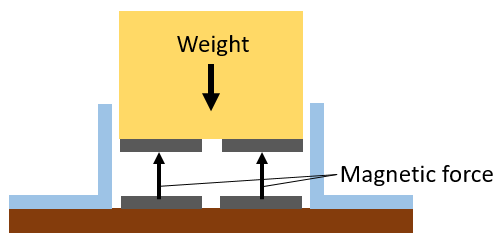
Figure 1. A cross-sectional diagram of the maglev train. The train has two magnets on the bottom of it. These magnets push against two magnets that form the tracks. If the force from the magnets is strong enough, the train will float in the air above the tracks.
In this project you will add weights to your train and measure the distance between the bottom of the train and the tracks. What happens when you add weight to the train? Will it still levitate? Try this project to find out!
Terms and Concepts
- Magnetic levitation
- Maglev
- Magnets
- Magnetic field
- Force
- Magnetic poles
- Weight
- Gravity
- Mass
- Grams
Questions
- What is a magnet?
- What are some different kinds of magnets?
- What determines whether a magnet pushes or pulls on another magnet?
- How does magnetic force change with distance?
Bibliography
- Rader, A. (n.d.). Electricity & Magnetism: Magnets. Physics4kids.com. Retrieved March 4, 2016.
- Bosnor, K. (n.d.). How Maglev Trains Work. HowStuffWorks. Retrieved March 4, 2016.
For help creating graphs, try this website:
- National Center for Education Statistics, (n.d.). Create a Graph. Retrieved June 25, 2020.
Materials and Equipment
Note: the dimensions listed here match the materials shown in the Procedure. You can use parts with different dimensions, but will need to adjust some of the spacing for your train accordingly (see Figures 3 and 4 in procedure). The materials for this project are available online or at a hardware store.
- Magnetic tape, 1/2" wide, cut into two 24" pieces and two 5" pieces. Note: You will need monopolar magnetic tape for this project, which means that each side of the tape has only one polarity (N or S). Many magnetic tapes that you can buy online are bipolar or multipolar, which means that they consist of many strips of alternating N and S poles. If you buy a bipolar or multipolar tape, you can repolarize it to make it work in this project. Follow the instructions in step 7 of the FAQ section to repolarize the magnetic tape before you start with this project.
- 90° plastic angle pieces (2), 24" long and 3/4" wide
- Wood block, 5"×3/4"×1-1/2" (note: a piece of wood listed as 1"×2" at a hardware store has actual dimensions of 3/4"×1-1/2")
- Flat piece of wood or corrugated cardboard, at least 24" long and 3" wide
- Clear double-sided tape
- Scissors
- Pencil
- Paper or plastic cup
- Coins
- Ruler
- Kitchen scale
- Lab notebook
Experimental Procedure
Building Your Train
The following written instructions will show you how to assemble your train. Attention to detail and patience are needed for this project. After building, you will need to make adjustments to get it working perfectly. The train floats above the tracks well once everything is lined up carefully. See the FAQ if you have trouble getting your train to work.
- Before you start building your train, check to make sure you have the right magnetic tape. If you have monopolar magnetic tape, the strips of tape should repel each other. You can go ahead and use the monopolar tape as is. If the strips of your magnetic tape attract each other, the tape might be bipolar or multipolar. In that case, you will have to repolarize your tape first. Follow the instructions in step 7 of the FAQ section for this project to repolarize your magnetic tape. Once you are done, your magnetic strips should repel each other.
- Peel the paper backing off the two short magnetic strips and attach them to one side of the wooden block, as shown in Figure 2. The edges of the strips should line up with the edges of the block. This block will be your train car. Note: if the magnetic strips are not sticky enough to stick to the wood on their own, use clear double-sided tape.
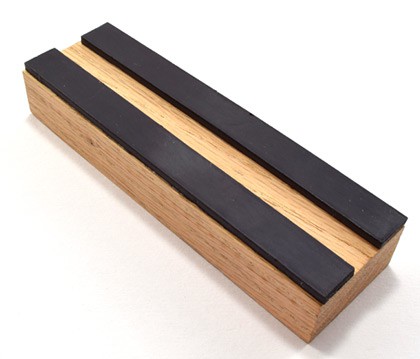
Figure 2. Magnetic strips attached to the wooden block.
- Cut a piece of wood or cardboard to use as the base of your train track, at least 24" long and 3" wide.
- Using one of the long plastic angle pieces as a straightedge, draw five lines lengthwise on the base as shown in Figure 3.
- Draw a center line down the middle of the base.
- Draw one line 5 mm to each side of the centerline.
- Draw one line 20 mm to each side of the centerline.
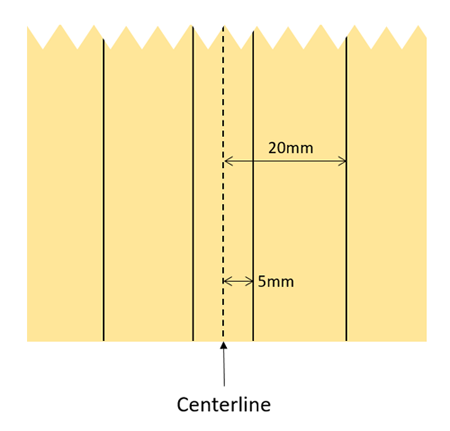
Figure 3. Dimensions for lines you will draw on your base.
- Attach the long magnetic strips and plastic angle pieces to your base, as shown in Figures 4 and 5. Pay close attention to the spacing, it is important for getting your train to work properly.
- Peel the paper backing off the long magnetic strips. Carefully place them on the base so their inside edges line up with the lines 5 mm from your centerline, so the strips are 10 mm apart. Note: if the magnetic strips are not sticky enough to stick to the base on their own, use clear double-sided tape. Make sure you press down firmly so they stick in place.
- Use double-sided tape to attach the plastic angle pieces to the base so their inside edges line up with the lines 20 mm from your centerline, so they are 40 mm apart.
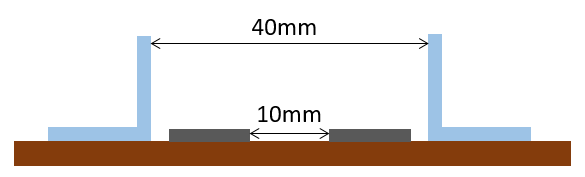
Figure 4. Cross-sectional view of the spacing for the magnet strips and plastic angle pieces.
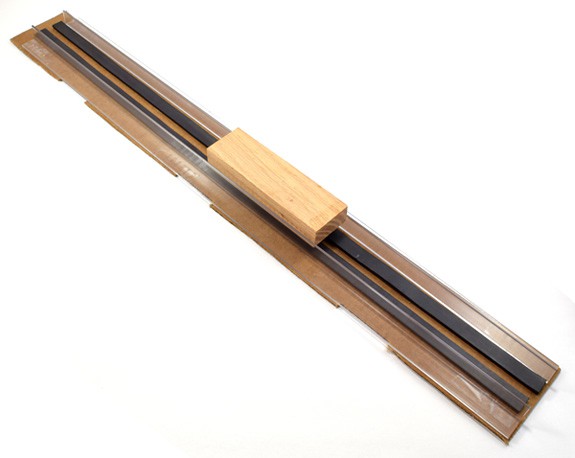
Figure 5. Picture of a completed track.
- Place your train on the track with the magnetic strips facing down. It should hover parallel to the tracks as shown in Figure 6, and you should be able to slide it back and forth without getting stuck. If your train does not hover as shown in Figure 6, see the FAQ for troubleshooting information.
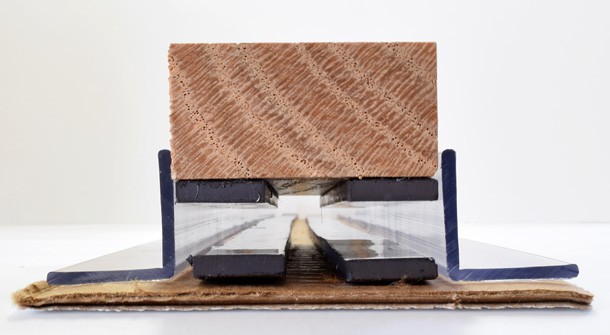
Figure 6. Train hovering parallel to the tracks.
Collecting Your Data
- Create a data table in your lab notebook, like Table 1.
- Note: Most kitchen scales display results in units of ounces or grams. In the metric system, scientists use grams (g), which are technically a unit of mass, not weight. Make sure you refer to "mass" and measure in grams when you do a science project. It is incorrect to say "weight in grams."
| Mass (g) | Distance (mm) |
|---|---|
- Use a ruler to measure the distance between the train and the track (between the top of the magnet strips on the track and the bottom of the magnet strips on the train), as shown in Figure 7. Record this value in your data table and write "0" in the mass column, since you have not added any weight to the train yet.
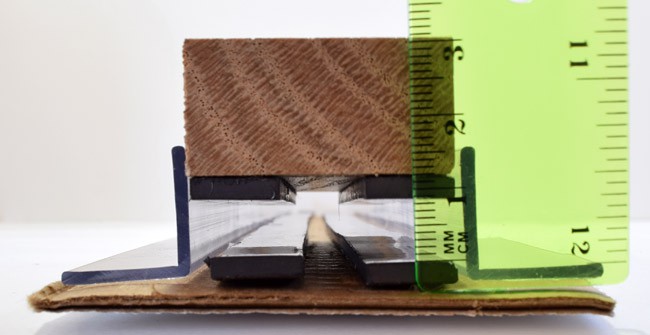
Figure 7. Use a ruler to measure the distance between the train and the track.
- Now, place a paper or plastic cup on top of the train and add some coins to it, as shown in Figure 8. Make sure the cup is centered on the train so it remains parallel to the tracks and does not tilt, as shown in Figure 9.

Figure 8. Train with weights added on top.
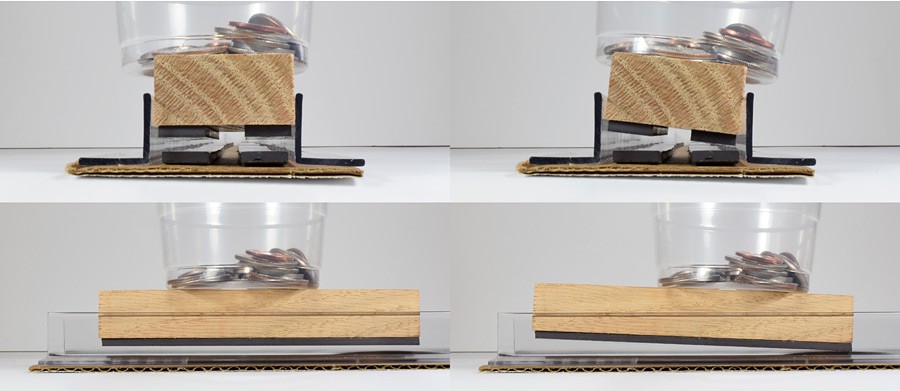
Figure 9. Check the train from both the front and the side to make sure it is still floating parallel to the track, as shown in the left two images. If the train is tilted, like in either of the right two images, then shift the location of the cup to balance the train.
- Measure the new distance between the train and the tracks. Record this distance in your data table.
- Use a kitchen scale to measure the mass of the coins, including the cup. Record this mass next to the new distance in your data table.
- Add more coins to the cup. Repeat steps 3–5 until the train touches the tracks (the distances is zero). Remember to measure and record the distance each time you add coins.
- Repeat the entire experiment two more times, for a total of three trials. For each trial, make a new data table, empty the cup, and start over again with no weight added to the train.
- Make a scatterplot of your data, with added mass on the horizontal (x) axis and distance on the vertical (y) axis.
- Analyze your results.
- How does the distance between the train and the tracks change as you add weight to the train?
- How do your results compare to your prediction?
- How can you connect your results to real-world maglev trains? For example, would there be a limit to how many passengers a real-world train can carry?
Variations
- Do your results change if you distribute the weight of the coins evenly across the top of the train, instead of piling them all into one central cup?
- Use something lighter than the wood block as the "train," like a flat piece of cardboard. How much higher does the train float? Note that to compare your results using the wood block, you would need to measure the absolute weight of the train (including the body of the train and the magnets), not just the added weight.
Frequently Asked Questions (FAQ)
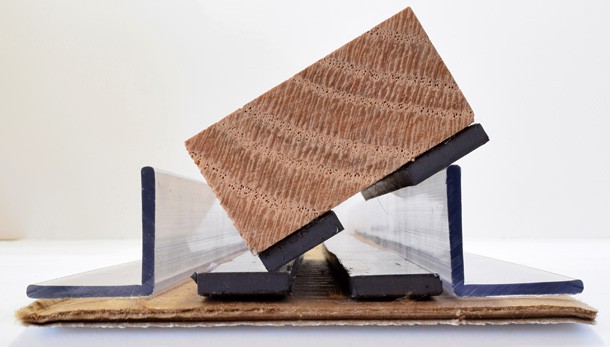
Figure 10. The plastic angle pieces on this track are too far apart, allowing the wooden block to tip over.
- First, make sure you have the right magnetic tape. The magnetic tape for this science project needs to be monopolar, which means that each side of the magnetic tape has only one polarity (N or S). Many magnetic tapes that you can buy online are bipolar or multipolar. This means they consist of many magnetic strips that alternate in polarity, as shown in Figure 11. These magnetic tapes will attract each other. If you happen to use a bipolar or multipolar magnetic tape, you can repolarize it. Follow the instructions in step 7 (below) to do that.
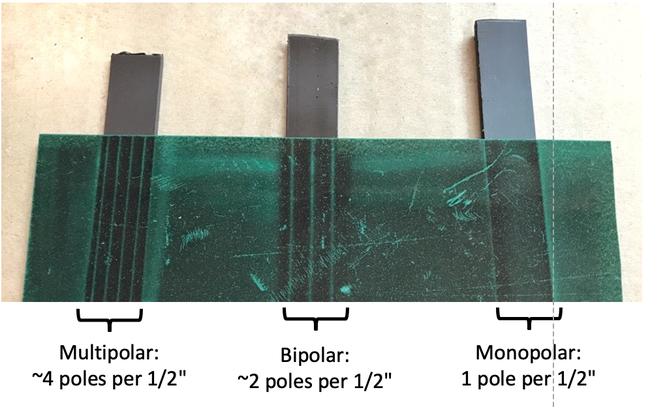
Figure 11. Magnetic tape can be multipolar (left), bipolar (middle), or monopolar (right). - The magnetic strips on your track might be too close together, like in Figure 12. As shown in Figure 4 of the procedure, the strips should be 10 mm apart. If they are too close together, then they will not be aligned with the magnetic strips on the train car, and this can result in the car being attracted to the tracks instead of repelled. If this happens, move the magnetic strips on your track farther apart.

Figure 12. The magnetic strips on this track are too close together, resulting in the train being attracted to the track instead of repelled.
- Your plastic angle pieces might be too far apart, like in Figure 13. This gives the train car too much room to shift side to side, and it can be pulled down to the tracks instead of repelled. As shown in Figure 4 of the procedure, the inside edges of the plastic angle pieces should be 40 mm apart. This gives the wooden block enough space to slide back and forth without getting stuck, but prevents it from moving side-to-side. If this happens, move the plastic angle pieces on your track closer together.
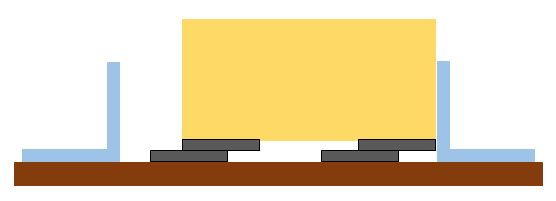
Figure 13. The plastic angle pieces on this track are too far apart, allowing the train car to shift sideways and be attracted to the track instead of repelled.
- The final and least likely possibility is that the polarization (which way the north and south poles face) of one set of your magnetic strips has been reversed, meaning the non-adhesive sides of the strips are attracted to each other instead of repelled. If the magnetic strips are touching each other and their edges are aligned like in Figure 14, you will need to repolarize two of your strips as described in the following steps. Only do this after you have tried steps 1 and 2 to make sure your spacing is correct.
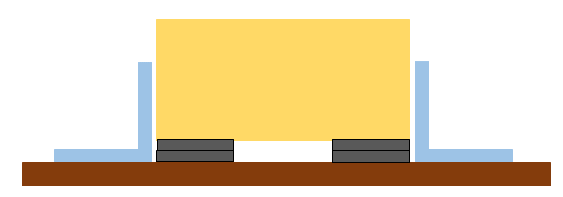
Figure 14. These magnetic strips are attracted to each other instead of repelled, so the train sits flat on the tracks with the strips aligned.
- You can use a compass to check the polarity of the magnetic strips. Hold the compass up to one of the magnetic strips on your train car as shown in Figure 15. Pay close attention to whether the red tip of the compass needle points towards or away from the magnetic strip.
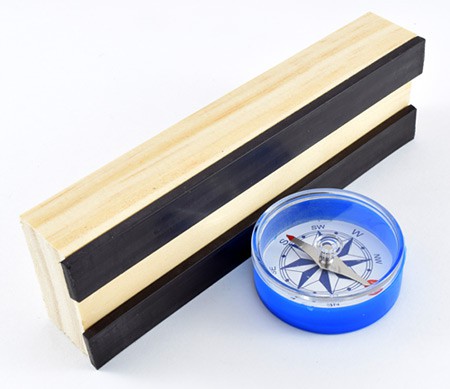
Figure 15. The red tip of the compass needle points towards the magnetic strip in this image (your result may be the opposite). Ignore the N/S/E/W markings on the compass, you only need to look at the needle.
- Do the same thing for one of the magnetic strips on your train track.
- If your results are the same for both strips (the red needle tip points towards both of them, or points away from both of them), then your strips are polarized correctly and should repel each other. Go back to steps 1 and 2 to check the alignment of your track.
- If your results are different for both strips (the red needle tip points towards one of the strips, but away from the other one), then you need to re-polarize one set of your strips. Proceed to step 7.
- You can use a small neodymium magnet to re-polarize the magnetic strips by rubbing it against them, as shown in Figure 16. To do this:
- Check again whether the magnetic strips on your train car attract or repel the red tip of the compass needle.
- Find the end of the neodymium magnet that attracts the same end of the compass needle as the magnetic strip on the train car.
- Slowly rub this end of the magnet along the entire magnetic strip, going back and forth several times to cover its entire width.
- Do this for both magnetic strips on your train car.
- Place your train car on the track and see if it hovers instead of touching the track. If not, you may need to keep rubbing the same end of the neodymium magnet along the car's strips to increase their strength (do not re-check the strips with the compass each time, or you will continue to reverse their polarization).
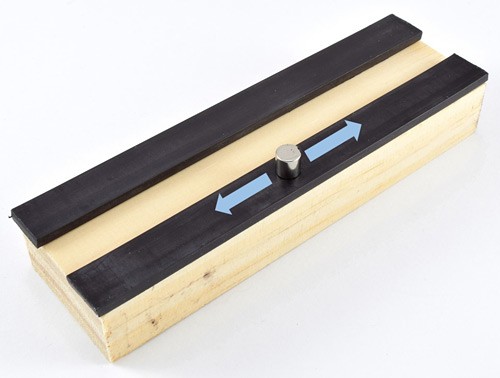
Figure 16. Rub the neodymium magnet along the magnetic strip to repolarize it.