Ball Launcher Challenge
Abstract
Try your hand at this engineering challenge. Can you build a "launcher" device to launch a ball as far as possible and a "receiver" to catch it? Building a receiver provides an extra twist to a traditional catapult project. Add to the challenge by using a limited set of materials to build your machine and calculate a score based on your throw distance and materials used.Summary
Objective
Use craft supplies to build a launching device to throw a ball as far as possible and a receiving device to catch it.Introduction
Throwing and catching a ball is something you might easily do with a friend, without giving it much thought. You just "know" how to move your arms, hands, and fingers to throw and catch. Can you imagine building a machine to throw a ball instead? How would it know to throw the ball a certain distance? How could another machine catch the ball without dropping it? This project provides a fun engineering challenge: use common materials to build a "launcher" to throw the ball and a "receiver" to catch it. Figure 1 shows some example devices.
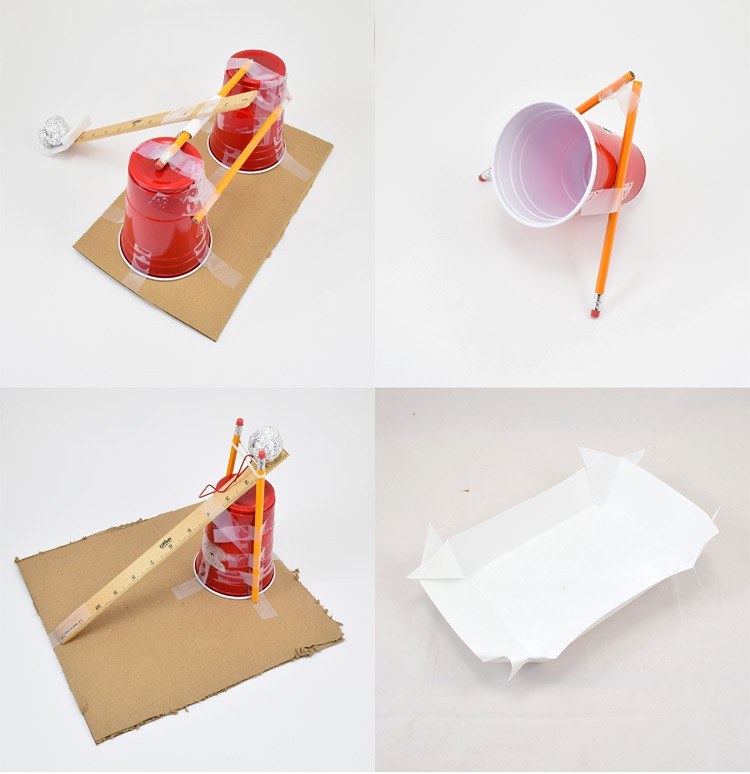
Figure 1. Different designs for launching (left) and receiving devices (right).
This challenge gives you the opportunity to explore some interesting topics in physics and engineering. Rather than explaining each of these topics in detail, this background section will give you a brief overview of each one, and then you can do more research using the links in the bibliography. If you are doing this project for a science fair, do not worry about learning about all of these topics. Choose one or two to learn about in more detail.
First, this is a great opportunity to learn about simple machines, like the lever or the inclined plane. You can also investigate more complex machines, like catapults, trebuchets, or slingshots, that are used to launch projectiles. Think about how you could incorporate different aspects of these machines into your design.
You can also use this project to learn about projectile motion. How do the initial velocity (starting speed) and launch angle (angle at which an object leaves the launcher) of a projectile affect its range (distance it travels)? What trajectory (path through the air) will make it easier to catch the ball? A high, steep trajectory or a low, shallow trajectory?
You can also use this project to learn about energy. The ball needs kinetic energy, the energy of motion, in order to fly through the air. Where will that energy come from? It could come from elastic potential energy, the energy stored in a stretched material, like a rubber band. It could come from gravitational potential energy, the energy stored in an object that is raised up off the ground. Or, the energy could come from work that you do with your hand by exerting a force. How could your machine convert one form of energy to another?
Finally, you can use this project to demonstrate the engineering design process. You will probably not think of an idea for a machine, sit down and build it, and have it work perfectly on the first try. You might need to come up with multiple designs, test more than one of them, and modify the designs to improve them. This is OK—real engineers rarely get things right on the first try!
Terms and Concepts
- Simple machine
- Lever
- Inclined plane
- Complex machines
- Catapult
- Trebuchet
- Slingshot
- Projectile motion
- Initial velocity
- Launch angle
- Range
- Trajectory
- Energy
- Kinetic energy
- Elastic potential energy
- Gravitational potential energy
- Work
- Force
Questions
- Look at the list of items in the materials section. How could you build a machine to launch a ball using these materials?
- What will provide the energy to launch the ball?
- How could you build something to catch the ball without dropping it?
Bibliography
- Science Trek (n.d.). Simple Machines: Facts. Idaho Public Television. Retrieved June 27, 2022.
- Henderson, T. (n.d.). What is a projectile? The Physics Classroom. Retrieved October 30, 2017.
- Henderson, T. (n.d.). Work, Energy, and Power. The Physics Classroom. Retrieved October 30, 2017.
- Science Buddies Staff (n.d.). The Engineering Design Process. Science Buddies. Retrieved October 30, 2017.
Materials and Equipment
If you are just doing this project for fun or for a school science project, you can use any materials you want. However, if you want to compare your results to those of other students who did the 2018 Engineering Challenge, you can only use the materials listed below. Each item has a maximum allowable quantity and a point cost (each) that will be deducted from your score, as described in the procedure. Note that you can cut the materials, but costs are not pro-rated; e.g. if you cut a piece of paper in half and only use half of it, it still costs 10 points.
| Construction Materials | ||
|---|---|---|
| Item | Maximum Quantity |
Point cost (each) |
| Corrugated cardboard base (max size 12"x12" or 30x30 cm) | 1 | 0 |
| Large paper or plastic cups (16–18 oz, or about 450–500 mL) | 4 | 50 |
| Wooden ruler or paint stirrer (12"/30 cm) | 2 | 100 |
| Paper (printer/copier paper, not construction paper or cardstock; letter or A4 size) | 10 | 10 |
| Wooden pencils (circular or hexagonal cross-section, approx. 7–8" or 18–20 cm length) | 10 | 10 |
| Rubber bands (size 32, 3" long unstretched and 1/8" wide) | 10 | 20 |
| Large paper clips (approx. 2" or 50 mm length) | 10 | 5 |
| Roll of clear adhesive tape (Scotch® tape or equivalent, 1/2" or 3/4" width, max length 500") | 1 | 100 |
| Tools and Testing Materials (no point cost) | |
| Item | Notes |
| Paper and pencil | For sketching design ideas |
| Scissors | For cutting construction materials |
| Metric tape measure | If you only have an inch tape measure, you will need to convert your measurements to centimeters |
| Sheet of aluminum foil | 12"x12" or 30x30 cm sheet, tightly crumpled into a ball with a diameter of no more than 2" (5 cm) |
| Large, open area of floor space for testing | At least 10 feet or 3 meters |
Experimental Procedure
Objective
Note: the 2018 Engineering Challenge is over, but you can still do this project on your own!
The objective of the 2018 Engineering Challenge was to use limited materials to build one device (the launcher) that launches an aluminum foil ball and another device (the receiver) that catches the ball. The farther your ball flies before being successfully caught by the receiver, the more points you get.
If you want to follow the format of the 2018 Engineering Challenge, you must follow these rules:
- You can only use items listed in the table in the materials section to build your launcher and receiver.
- The maximum quantities listed are total for the project, not for each separate device.
- No other materials are allowed. For example, you cannot build your launcher out of LEGO®.
- The cardboard base must remain flat. It cannot be folded, and you cannot cut off smaller pieces to use for construction.
- You are allowed to cut the materials (for example, cut a piece of paper in half, cut holes in a cup, etc.). However, point costs for the materials are not pro-rated.
- The launcher must fit on top of a 12"x12" (about 30x30 cm) piece of cardboard and cannot extend past the edges of the cardboard. There is no height restriction.
- The receiver can measure no more than 12" wide by 12" long (about 30x30 cm). There is no height restriction.
- Only one person can operate the launcher at a time.
- You can use both hands to load the ball into the launcher. You cannot touch the ball after it is loaded. You cannot use both hands to store energy in the machine (e.g. stretch a rubber band or raise a weight), only to load the ball.
- You can use one hand to hold down the cardboard base of the launcher when launching the ball. You cannot hold on to any other part of the launcher in order to stabilize it or prevent it from moving.
- You can use only one finger to activate the launcher (if you are holding down the base with one hand, you will use one finger from your other hand). This includes any action that exerts a force or stores energy. For example, pressing on one side of a lever, stretching a rubber band, or lifting a weight into the air can only be done with one finger. You cannot use your whole hand or fist to strike a lever. You cannot use multiple fingers to stretch the rubber band and then include a "trigger" mechanism that allows you to release it with just one finger.
- The receiver must be free-standing (it cannot be held in place or stabilized by a person, or taped to the ground). No one is allowed to touch the receiver during a test.
- The ball must land and stay in the receiver without touching the ground or anything else (a wall, a person, etc.). The ball cannot roll or bounce into the receiver, or bounce out of the receiver after landing in it initially. If the receiver falls over, but the ball remains in the receiver and does not touch the ground, that is OK.
- There is no limit to the number of tests you can do to try to get a higher score, but you can only submit one official score per team.
Design
- Make sure you read and understand all the contest rules before you start.
- If you are unsure how to start designing, try these tips:
- Take some inspiration from other launching or receiving devices you have seen in the real world or online, like slingshots, catapults, a baseball pitcher and glove, bowls, baskets, and nets.
- Sketch more than one idea when you are brainstorming.
- Compare ideas—remember that the more materials you use, the more points it costs.
- If you are working in a team, compare and contrast your ideas and even try combining them to make a better idea.
Build
- Once you have decided on a design, build it. If you are working with a team, you may want to assign different jobs to each person in the group to make sure everyone gets a chance to participate. For example: one person can gather the materials, one person can hold the items in place while someone else tapes them together, and one person can monitor the design to make sure it matches the sketch you drew. Or, you could split into sub-teams, and one team can build the launcher while the other team builds the receiver.
- You might need to modify your design, even as you build it! For example, you might discover that two parts do not fit together like you thought they would. This is OK and a normal part of the engineering design process. Just be sure to keep track of the materials you use in your final design when you calculate your score (materials you used in earlier prototypes do not count, so do not be afraid to experiment!).
Test
- Crumple up a sheet of aluminum foil (12"x12" or 30x30 cm) into a wad with a diameter of less than 2 inches. This will be your "ball."
- Experiment with your launcher. Try using it to launch the aluminum foil ball.
- Can you operate the launcher as described in the rules (one person uses one hand to hold down the base and one finger to activate the launcher)?
- Is the launcher sturdy? Do all the parts stay together? Can it stand up to the stress of repeated launches?
- What is the range of your launcher? How far can you launch the ball?
- How accurate is the launcher? Can you hit the same spot on the floor more than once?
- Are there any changes you can think of to improve the design of the launcher?
- Experiment with your receiver. Try using your launcher to launch the ball into it and/or just throwing the ball at the receiver. Remember that you cannot touch the receiver during a test.
- How easy is it to hit the receiver? Would changing its size or shape affect this?
- How stable is the receiver? Does it fall over when the ball hits it? If so, does the ball stay inside without touching the ground?
- How bouncy is the receiver? Does the ball tend to stay in it or bounce out of it?
- Can you think of any changes to improve the receiver?
- If you are working with teammates, discuss your observations as a group. You might want to modify your launcher and/or receiver design before you start official testing. Remember that this is OK! Real engineers rarely get a design perfect on the first try. You can go back to re-design, re-build, and re-test your design as needed (as time allows).
- When you think your design is ready, move on to the next section to try an official test and calculate your score (you will still be allowed to come back and make further changes to your design).
Official Test
When you are ready to do an "official" test and calculate your score, follow these steps:
- Place your launcher and receiver on a long, flat surface, like the floor or a countertop.
- Use a tape measure to measure the horizontal distance in centimeters between the front of the launcher's base and the closest point on the receiver, as shown in Figure 2. You can make the distance between the launcher and receiver as large as you want—the longer the distance the ball flies before being successfully caught, the better your score will be. A distance of about 30 cm is a reasonable distance to try first.
- Launch the ball into the receiver. Remember to follow the rules:
- Only one person can operate the launcher. That person can use one hand to hold down the launcher's base and one finger to activate the launcher.
- No one can touch the receiver during a test.
- The ball must land and stay in the receiver without ever touching the ground.
- If you do not get the ball to land in the receiver on your first try, try again (there is no limit on the number of tries). If you are still unsuccessful after a few more attempts, you might need to modify the design of your launcher and/or receiver or reduce the distance between the launcher and receiver (remember, 30 cm is a good distance for a first test). If you are working with a group, discuss the problems you have encountered and make changes to your design and/or test distance if necessary.
- If the ball lands in the receiver, move on to the next section to calculate your score. You can always come back to this section to try for a higher score (longer distance).
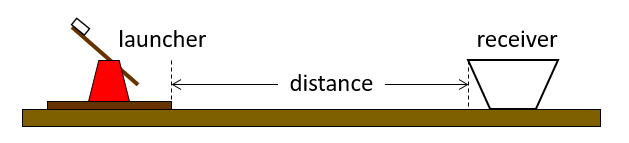
Figure 2. How to measure distance between the launcher and receiver. Measure the horizontal distance from the front of the launcher's base to the closest point on the receiver.