Explore Optical Illusions: Build an Infinity Mirror
Abstract
Do you want to trick friends and visitors with an amazing optical illusion? In this engineering design project you will learn how to build an infinity mirror,with built-in lights that make the mirror look like a deep tunnel with no end. But pick the mirror up and look behind it, and you will see that it is only a couple of inches thick! Read this project to find out not only how this illusion works, but how to design and build your very own infinity mirror from scratch.
Summary
Objective
Design and build your own infinity mirror.
Introduction
An infinity mirror creates an optical illusion of an infinitely long tunnel. It actually consists of two mirrors — a regular mirror and a one-way mirror — with light emitting diodes (LEDs) sandwiched between them. When the LEDs are turned off, the infinity mirror acts just like a regular mirror. But when the LEDs are turned on, the infinity mirror looks like a brightly lit tunnel that stretches off to infinity. This engineering design project will show you how to build your own infinity mirror. Before you get started with this project, watch this introductory video to learn more about infinity mirrors and how they are built:

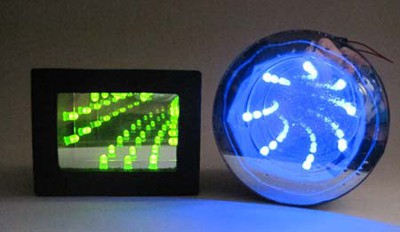
Figure 1. Infinity mirrors can vary in size, shape, color, and complexity. This project will show you how to build a relatively small mirror like the ones shown here, but some people have built table-sized infinity mirrors. Both of the infinity mirrors shown here have a battery pack mounted on the rear, so there is no external power cord.
Terms and Concepts
- Infinity mirror
- Optical illusion
- Light emitting diode
- Perimeter
- Resistor
Questions
- How does an infinity mirror create the illusion of infinite depth, when it clearly has a limited thickness?
- Start thinking about the design of your infinity mirror:
- What size and shape do you want it to be?
- What type of lights do you want to use?
- Where do you want to display it? Hanging on a wall, sitting on a desk, on the floor, where?
Here is the short list of parts you will need to build an infinity mirror. See the full list below for details and suggestions about where to buy each part.
- Mirror
- Plexiglass or acrylic sheet
- Mirrored window film
- Cardboard box or other container
- LEDs
- Power supply
- Tape or glue
- Cutting tool
- Safety glasses or protective goggles
Details and supplier suggestions:
- Mirror
- Small mirrors of a variety of shapes and sizes can be purchased at arts and crafts stores or online vendors like Amazon.com (for example square mirrors and round mirrors).
- Other vendors like McMaster-Carr carry mirrored acrylic, which can be a cheaper alternative to a regular mirror.
- Plexiglass sheet
- Plexiglass sheets can be purchased at a hardware store or online vendors like Amazon.com.
- Plexiglass sheets are available in different thicknesses. 1/8 inch plexiglass should work well for this project. Thicker plexiglass is harder to cut.
- Note: You will need to cut the plexiglass sheet to size to fit your mirror. Adult supervision is recommended. It is relatively easy to cut a rectangular piece of plexiglass, but cutting a circle can be more difficult (see Procedure). Some vendors like McMaster-Carr sell precut plexiglass circles (click on "Optically clear and colored cast acrylic", then scroll down the page to the circular pieces).
- Note: Several different brand names and materials are commonly called "plexiglass," such as acrylic and polycarbonate. Some of them have a different hardness or resistance to shattering. All that really matters for this project is optical clarity — make sure the plexiglass you buy is clear and not translucent or opaque.
- Mirrored window film
- Window film can be purchased at a hardware store or from online vendors like Amazon.com.
- Window film is usually sold in quantities much larger than what you will need for this project, because it is intended to cover entire windows in a house. You could try asking a hardware store for a small sample of film.
- Cardboard box or other container
- The size and shape of the container you use will depend on the size and shape of your mirror. Papier mâché boxes are convenient, and can be purchased at an arts and crafts store or Amazon.com.
- You could also build your own custom-sized container by cutting up pieces of cardboard and gluing them together.
- LEDs
- The type of LEDs you use is up to you, depending on how you want your mirror to look. There are several different options that can change the difficulty level of the project.
- Regular Christmas lights are easiest to use because you can plug them directly into a wall outlet. You can find a huge selection of LED Christmas lights at a department store or Amazon.com.
- LED strips can give a different look to your mirror than Christmas lights. Some LED strips offer additional features, like remote-control color-changing options. But they may be slightly more complicated to set up, and some (but not all) require soldering to attach them to a power supply. Many different types of LED strips are available from Amazon.com and Jameco Electronics.
- Individual LEDs can give you complete control over the customization of your mirror, but they require soldering to connect them and also to attach them to a power supply. You will also need to include a resistor in your circuit to prevent the LEDs from burning out. This option is recommended only if you are familiar with electronics projects or have an adult who can help. A huge selection of individual LEDs is available from Amazon.com and Jameco Electronics.
- Power supply
- Most Christmas LED lights can plug directly into a wall outlet.
- Some LED strips can plug directly into a wall outlet, but others may require a separate DC adapter (similar to the charger for your laptop or cell phone). A variety of DC adapters are available from Amazon.com and Jameco Electronics. Important: In purchasing a power supply, be sure to buy one that matches the specs for your LED strip.
- If you are wiring a circuit with individual LEDs, you will need a battery holder. This has the advantage of making your mirror portable, so you can hang it on a wall without having a power cord dangling down. Battery holders are available from Amazon.com and Jameco Electronics. Important: The number of batteries you need depends on how many and what type of LEDs you use. You will also need resistors to prevent the LEDs from burning out, and hookup wire (available in various colors from Jameco Electronics) to connect the LEDs. See the Procedure for details.
- Tape or glue
- You will need to assemble all the different components of your mirror and hold them in place. How exactly you do this is up to you, and it may depend on the exact materials you buy. For example, you could use duct tape, electrical tape, super glue, or craft glue, depending on the details of your project.
- Tools
- You will need a craft knife or a utility knife and scissors to cut various materials like the papier mâché box, the plexiglass, and the window film.
- If you are wiring your own circuit, you will need a soldering iron and solder.
- Safety goggles for cutting the plexiglass.
Experimental Procedure
Design Your Infinity Mirror
After watching the video in the Introduction, sketch out a design for your mirror on paper. Remember that this project follows the engineering design process — and engineers always make plans before they start building anything! The steps below are guidelines for things you probably want to consider when designing an infinity mirror. But remember: this is your design. You get to choose what your mirror looks like, and you do not have to follow these pictures or ideas exactly. Once you are happy with a design for your infinity mirror, you can create a list of parts and go back to the Materials list for specifics.
- The first decision you will need to make is how big and what shape you want your infinity mirror to be. This will determine the size and shape of the box or case you use, along with the regular mirror and piece of plexiglass. See Figure 2.
- Important: Be careful with box and mirror sizing. For example, a 6 inch diameter circular mirror will not necessarily fit inside a 6 inch diameter papier mâché box. Six inches could be the outer diameter of the box, and the inner diameter might be slightly smaller (for example, 5-7/8 inches). Remember that you can also use the lid of the box (which will be slightly larger), or build your own custom-sized box out of cardboard or cardstock.
- You might want to use two boxes, one slightly larger than the other. This way, you can pack the wiring for your lights between the two boxes so you do not have extra wiring dangling from the outside of your infinity mirror. See Figure 3.
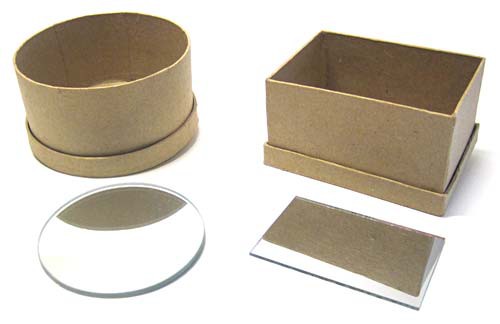
Figure 2. Circular and rectangular papier mâché boxes and the corresponding mirrors that will fit inside them.
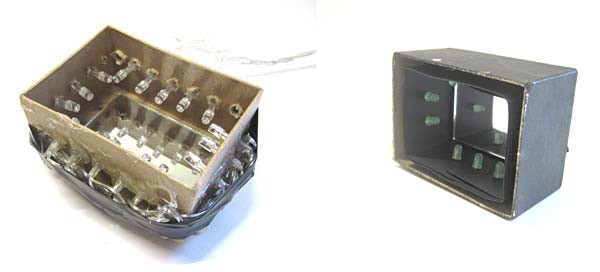
Figure 3. The infinity mirror on the left uses a single box, which leaves the LED strand wiring exposed on the outside. This can look a little messy. The infinity mirror on the right uses two boxes (an outer papier mâché box, and an inner one made from cardstock or cardboard). This lets you put the LED wiring in between the two boxes, giving the outside of the box a much cleaner appearance. But remember, your design choices are up to you!
- Think ahead about how you will cut your plexiglass to the appropriate size and shape for your mirror, and what tools you will need (see Figure 4).
- Important: Adult supervision is required when using sharp handheld tools or power tools. Always wear appropriate safety gear (e.g., eye protection) and follow all safety precautions for the equipment you are using.
- In general, it is easier to cut rectangular pieces of plexiglass than circular or irregularly shaped pieces. You can do this by scoring straight lines in the plexiglass using a utility knife or special plastic-cutting knife, and then breaking the plexiglass along the scored line.
- If you need to cut a circle, you can use a fine-toothed jigsaw blade or bandsaw. Some vendors sell precut circles of plexiglass (see the materials section for details).
- In both cases, C-clamps are extremely helpful for safely holding the plexiglass down to the edge of a work table.
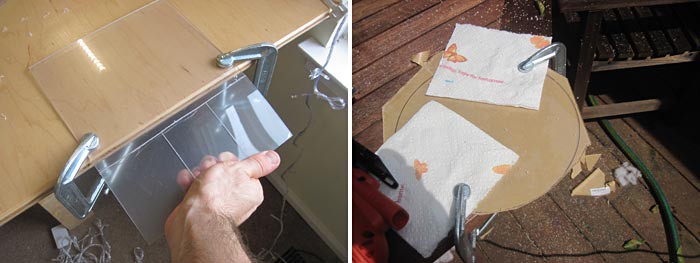
Figure 4. Two different ways to cut plexiglass, depending on the shape of your mirror. To make rectangular cuts, score a straight line with a knife and then snap the pieces off (left). To make circular or irregular cuts, use a fine-toothed jigsaw blade (right).
- Determine what type of lights you want to use. Figure 5 shows several different light options.
- You can figure out how many lights (or how long of a strand of them) you need by calculating the inside perimeter of your infinity mirror. For example, a 2x3 inch box has a perimeter of 10 inches.
- Many strands of Christmas lights are sold in much longer lengths; for example 10, 25, or 50 feet [ft.] — more than you will probably need. You can still use a longer strand, but you will have to bundle up all the extra lights. Do not cut off any extra lights unless the instructions that come with the lights say it is OK to do so.
- Certain LED strips can be cut to a shorter length, and some cannot. Be sure to read the product information before you purchase an LED strip, to make sure it will work for your project. For example, some LED strips can be cut to shorter lengths, but only in 3 inch segments. That will not work if the inner diameter of your mirror is 8 inches, because 8 is not a multiple of 3.
- If you are using individual LEDs, you will have to figure out how closely spaced you want them to be, and then purchase enough to fill your mirror. For example, if the inside perimeter of your mirror is 8 inches, and you want an LED placed every ½ inch, then you will need to buy 16 LEDs. You will also need additional materials (battery pack, connecting wire, a soldering iron, and a resistor) to connect them — see the technical note below.
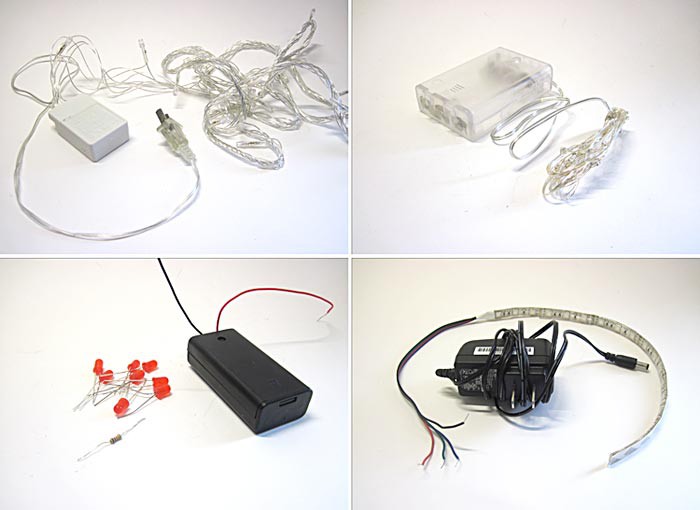
Figure 5. Different LED options. Clockwise from top left: a strand of Christmas lights that plugs into a wall outlet; a smaller battery-powered strand of lights; an LED strip with a DC adapter; and individual LEDs with a battery pack and a resistor.
You also need to include a current-limiting resistor. The resistor prevents too much current from flowing through your LEDs and burning them out.
- Figure out how you are going to attach all the different parts of your mirror. How will you attach the mirror to the inside of the cardboard box? What about attaching the plexiglass to the front? How will you hold the LEDs in place?
- For example, you could use either double-sided tape or superglue to mount the mirror to the bottom of your box.
- You could poke tiny holes in the sides of your box, stick the LEDs through, and let them be held in place by friction. Or, you could add some glue, using a hot glue gun to make sure they do not move around.
- Think about the assembly process — remember that you want to be very careful not to get any glue on the surface of either mirror.
- Plan ahead for how your infinity mirror will look. Are you OK with just a rough-looking mirror that you can use for a science project? Or do you want a nicer mirror that you can hang on the wall of your home? Will you want to paint the outside of your mirror a certain color, or make sure that there are no loose wires visible from the outside?
- Once you have given some thought to everything mentioned in steps 1–5, make a complete list of materials and tools that you will need to build your mirror. You might have to make a trip to a hardware or arts and crafts store, or you can go back to the Materials section for links to buy some of the parts online. Once you have all the parts, you are ready to move on to the next section and start building.
Building Your Infinity Mirror
Remember: This Procedure is a general set of guidelines to build an infinity mirror. Depending on the design of your mirror, you might not follow these steps exactly. If you think you have a better idea for how to build your mirror, try it your way instead.
- As a first step, poke holes in the sides of the papier mâché box for your LEDs, as shown in Figure 7. You can do this with a sharp knife, a power drill, or even a pointy pen.
- Note: If you purchased an LED strip, you may be able to mount it flat to the inside walls of the box, without making holes.
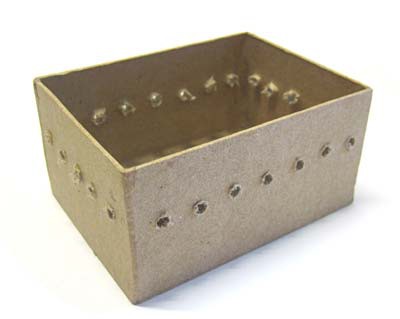
Figure 7.Drill or poke holes in the sides of a papier mâché box, through which you will insert the LEDs.
- Next, mount the mirror inside the box using an adhesive. Figure 8 shows a mirror being mounted using double-sided foam tape, but you could also use glue.
- Handle the mirror by the edges so you do not get any fingerprint smudges on it. Use a clean object, like a paper towel, to firmly press down on the surface of the mirror so it sticks to the tape.
- Be very careful not to get any glue, or the sticky side of tape, on the surface of the mirror. The cleaner the mirror is, the better the optical illusion will look.
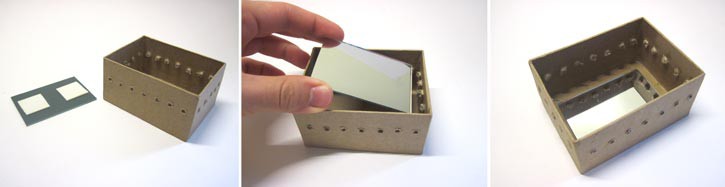
Figure 8. Mounting the mirror inside the box using double-sided foam tape.
- Insert the LEDs. How exactly you mount them will depend on the type of LEDs you are using. See Figure 9 for some options.
- If you just push the LEDs through the holes, they might not stay in place very well (see the top image in Figure 9).
- You can use a hot glue gun to attach the base of each LED to the box, holding it in place (center image).
- You can use tape to bundle up all the excess wire on the outside of the box (bottom image). Remember that you can also put this box inside a larger box to conceal all the extra wires.
- If you are using individual LEDs, remember that you will need to solder wire to connect them and the resistor, according to the circuit diagram in Figure 6.
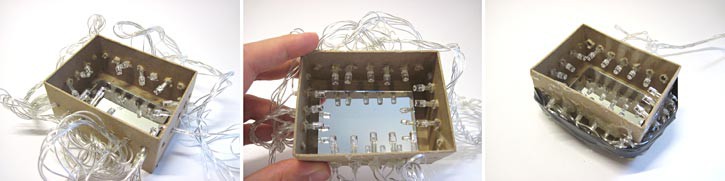
Figure 9. LEDs simply pushed through the holes in the sides of the box (top) may not be stable enough. Glue at the base of each LED holds them in place so they form a regular pattern (center). Electrical tape around the loose wires on the outside of the box holds them in place (bottom).
- Use a hobby knife to cut a hole in the lid of the box, as shown in Figure 10.
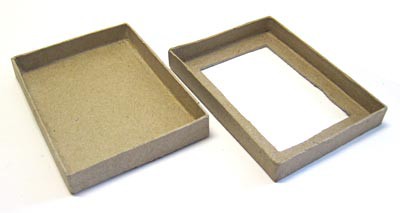
Figure 10. Box lid (left) and a lid with a rectangular hole cut in it (right).
- Cut your plexiglass to the appropriate size for your mirror. Adult supervision and protective eyewear are required for this step.
- If you are cutting a rectangular piece of plexiglass, use a ruler and a utility knife (or a special plastic-cutting knife, which you can find at a hardware store) to score straight lines into the plexiglass. You will need to score the plexiglass deeply in order for it to break easily. See Figure 11.
- Hold the plexiglass at the edge of a table, preferably using C-clamps, and press down on it to snap off a piece. Repeat the process along each score line.
- If you are having trouble breaking the plexiglass, try making a deeper score line. You can also store the plexiglass in the freezer for a few hours (this will make it more brittle) and then try again immediately after removing it from the freezer.
- If you need to cut a circular piece of plexiglass, have an adult help you use a jigsaw or a bandsaw with a fine-toothed blade (a rough-toothed wood-cutting blade will cause the plexiglass to shatter or crack).

Figure 11. Score the plexiglass deeply with either a utility knife (top left) or a plastic-cutting knife (top right), using a ruler as a straightedge. Then, clamp the plexiglass to the edge of a table and bend it to break off pieces along the score lines (bottom left and bottom right).
- Apply the window film to the plexiglass (see the images in Figure 12).
- Make sure you read the instructions for applying your window film. The instructions might vary depending on what kind you purchased.
- Some window films recommend using water or a special spray as a lubricant to apply the film. Read the directions for your film and apply a lubricant to the plexiglass if necessary (Figure 12, top left image).
- Most window films come with an adhesive backing that will stick to windows. There is a protective covering on the adhesive side. You will need to peel up one corner of this covering (top right image).
- Carefully apply the window film to the plexiglass (center left image).
- Do not use your fingers to smooth out the film — remember that you do not want to create smudges or fingerprint marks! Instead, use a paper towel, or a squeegee if you have one available. An index card or heavy business card will also work. Do your best to smooth out the film (center right image).
- Use a utility knife to trim the excess film off around the edges of the plexiglass (bottom left and right images).
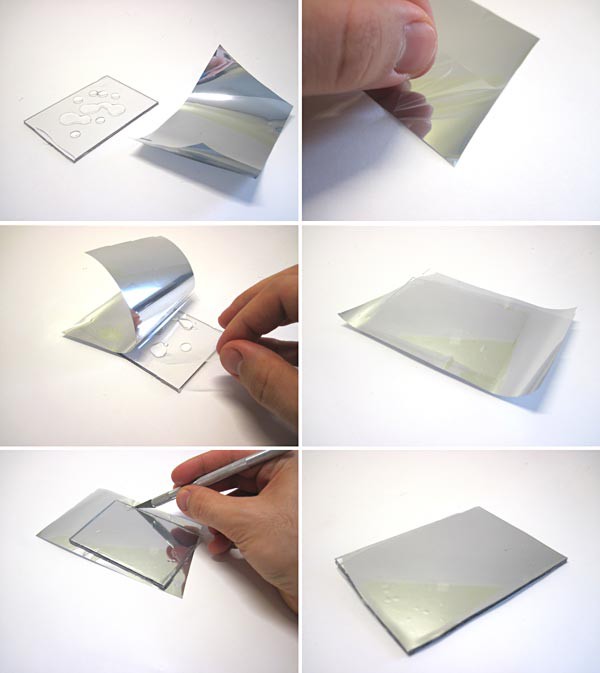
Figure 12. Applying the mirrored window film to the plexiglass.
- Mount the plexiglass mirror to the inside of the box's lid, as shown in Figure 13.
- You can do this using either glue (left image) or double-sided tape.
- Mount the plexiglass with the window film facing in, meaning it will be facing the inside of the box when you put the lid on. This way you do not have to worry about the window film peeling or getting scratched from being the outside of the box.
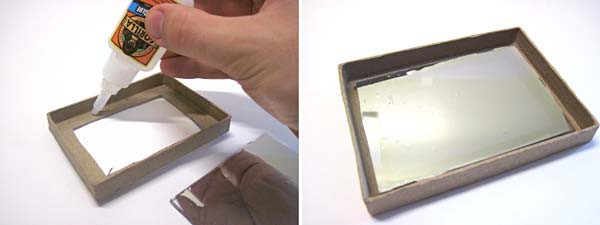
Figure 13. Mount the plexiglass mirror inside the lid.
- Put the lid on the box, as shown in Figure 14.
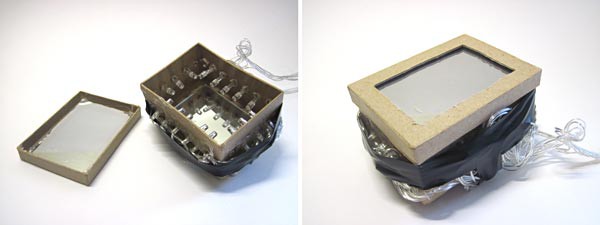
Figure 14. Putting the lid on the box is the last step in building your infinity mirror.
- Plug the lights in and test out your infinity mirror. The "infinity" effect will work best in a dark room.
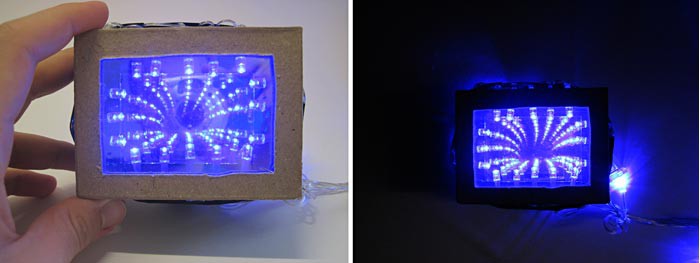
Figure 15. The infinity mirror in a well-lit room (left) and a dark room (right). Notice how in the dark room, the reflection of the camera in the mirror is much less apparent.
Troubleshooting
- If your LEDs do not turn on, double check the power supply connection, especially if you soldered a circuit yourself. Make sure you have fresh batteries if your LEDs use batteries.
- If your mirror appears smudged or dirty, try cleaning the plexiglass, mirror film, and regular mirror with window cleaner and a paper towel.
- If there are "bubbles" distorting the image, this is probably because the mirror film is not completely flat against the plexiglass. Try re-applying mirror film to a new piece of plexiglass, and do your best to smooth it completely flat.
- If your infinity tunnel appears to curve off to one side, this is because the plexiglass is not parallel to the regular mirror. Try adjusting the tilt of the lid slightly to straighten out the tunnel.